Thursday, 25 October 2012

Getting ready for Christmas Fairs

I don't go out to sell my work much these days, most of the local fairs like you to book well in advance and often won't let sellers book the odd day and prefer a commitment of at least three days. I can't do this anymore as it interferes with all sorts of things in our lives, the children need to be looked after, work would be impossible to re-arrange throughout that week and to be honest I would need to work flat out making, just to get enough stock ready and keep online shops full over the Christmas period and   a generous amount of stock to make a 3 day event viable.
However I do like to still do stalls if I can, the "one day kind" suits me better nowadays. So I have been thinking about how my stall will look next time.
I always tier up my work on different levels and have many shelves, boxes and bowls to put smaller items on.
I picked up this lovely old frame for £1 
from a second hand shop, it didn't
have any glass  in it 
but I didn't 
need any for what I wanted to use it for.
I gave it a good clean and oiled the wood and it came up like this. 

I took out the back and replaced it with 
several sheets of thick cardboard and covered it 
with a stone coloured linen and added some
 lace touches around the edges.  Many of my buttons have

 a vintage appearance and they also have lace imprinted 
onto the clay with some of them so I
thought the lace looked quite good on there.
I think this to be a better way to display my 

buttons, as before I felt they were often
 ignored and lost amongst my larger items, this way 

they can be seen at eye level.

I have used pins to attach the buttons onto the board


These little wooden pegs are covered with patterned papers,
music sheet and Japanese washi papers and I have attached a
 little porcelain disc on each one. Again these are a smaller item that often gets lost amongst larger
items and I have found this little wooden box to keep them in
so they can be stacked against each other.

White ceramic stars hanging from twisted hazel branches.??
They look nice but
whether they are practical on a table Im not sure, 
I can imagine them getting
 caught on things!

I have bought a bulk amount of these little Kraft lidded
 boxes to present my Christmas
decorations this year, they make good sense to me because 
I have to wrap up so much
 and this will save time both with online sales and 
wrapping and also wrapping
items behind a stall.
Thats the theory anyway!

These little glassine bags hold an individual ceramic 
heart in them, as yet Im not sure what to do with them 
or how to display them so that people know whats inside them, so for now they are stacked on the lid of a shoe box!
mmm.. needs some thought!

I have made these so that I can write any info and prices ect...
on them when I have set everything up. They have a flap 
at the back so they don't look flat on the table and they can stand up on their own, I havnt used these before
but I think they will be useful and saves me putting an 
individual price tag on everything.


Thursday, 4 October 2012

Making

I am making more buttons, they are lovely to make, so small and neat and easy to do. They also don't take up much space in the kiln and they look so nice when photographed.
Fuel your button passions here.


***


http://www.notonthehighstreet.com/littlebrickhouseceramics/product/two-handmade-ceramic-buttonshttp://folksy.com/items/2703086-Large-Ceramic-Button-with-Blue-Tree-Design

Thursday, 27 September 2012

Refining Tutorial. Porcelain Heart wedding favours

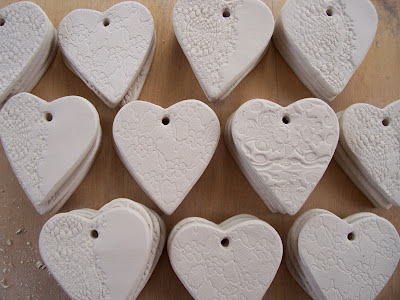
I have recently made 50 porcelain hearts that have been impressed with vintage lace for a lady who commissioned me to make them for wedding favours.
Here is the guide to the way I made them from the cutting out stage.
First of all I cut out the hearts with a cookie cutter and impressed half of them with lace over the whole of the heart.
 Then I impressed the other half with a thicker cotton lace over just half of the hearts, leaving one side smooth.

When the hearts are at leather dry stage as they are here in the photo above I begin to refine them. I remove all the rough edges and the burrs so I have a smooth heart.
(Leather hard stage means when the clay is firm but not too wet to work with and not so dry you cannot do anything with it and is more likely to break.) 

I also work on the reverse side so that they are smooth all around. 
I use the flat side of a knife to do this and I work all the way around taking off the side of the heart.

The next stage is probably the most time consuming which is smoothing all the hearts. I use a sponge and go along all the edges and then wipe over the front just gently. I also sponge the hanging hole so this is smooth as I don't want to damage the ribbon that I thread through with rough edges.


Here are two of the hearts ready.

After they have all been smoothed I am left with these clay filings, which I recycle as porcelain is so expensive and I don't like to throw any away unnecessarily. It just gets put back in a bag and I do a big recycle when the bag is full at another time.

I leave all the hearts stacked on top of each other to dry out in my workshop.

When they are all dry I check them all for warping, if they are good they go in the kiln, if not they go in the recycling bag as if they warp before firing they will warp more during the firing.


After firing I add the ribbons and they look like this.
*
Find them in my shop here.

Wednesday, 12 September 2012

School Tile Update

Gardening Club ceramics tiles
A few blog posts ago I mentioned a project that I did with the schools gardening club, you can review it here.
Well, after storing them in my garage over the summer I finally got them into the kiln a couple of weeks ago, and this is the final glaze firing for the tiles. They have glazed really well and I'm so glad I took the decision to only let them glaze the letters just one colour (much to the children's annoyance at the time) I didn't want to control how they used the colours but just felt that the letters would be lost in a mix of glaze colours if I hadn't.


The children collected leaves, twigs and other garden objects and imprinted them into the tiles.

The tiles need to be mounted onto a wooden sign now ready to be placed in the school garden. I will post more pictures when this is done.

Sunday, 2 September 2012

Making with porcelain clay (porcelain Owl Buttons)

Here are some photos of the owl buttons I have been making for my shop on Not on the high street.com since last year, I have started making them in batches like these, so I can keep better hold on how many I have.


These are the buttons that have just been made so they are still soft at this stage.
Once fired I coat half of them in the teal glaze  or the moss green glaze you see below.

The white buttons are left unglazed, the others either have a teal glaze or a moss
green colour fired onto them.

LinkWithin

Related Posts Plugin for WordPress, Blogger...