Pages

Sunday, 29 September 2013

The Right White

Ive been spending a bit of time gathering glaze recipes for a white stoneware glaze. Ive found three potentials which might be suitable for the kind of work I do. 
I already have all the dry ingredients stored in my workshop so I was determined to use them and not get lazy and buy a ready made one, as lovely as they are. ( Its quite satisfying to make a good one that suits the clay and Ive made it myself) The downside is they look great when you see an example but once Ive had a go at making it, it doesnt always resemble what I had in mind. 
So here goes, I have chosen 4 white stoneware glazes to make. 

The first two glazes I chose came from my glaze recipe book. They are very similar as you can see below they have all the same ingredients, but slight differences in measurements and types of oxides

. I have made the samples 1 & 3 on this page and named my samples glaze 1 and glaze 3

I have made small quantities of each one and I will compare all of them when they are fired , choose my favourite and make a large batch of the one I choose. They were all carefully weighed out on scales and put into plastic bags at first then mixed with a little water and left to settle in a jar.

After leaving the glaze to settle overnight I gave it a bit of a stir and painted them onto my already fired tile samples. (these all get pinned onto a board thats why they have holes on them)

On the reverse I have written the sample name on so I know which ones they are.
As you can see I have also decided to make a Lucie Rie Glaze aswell and then Gills White which looked good and fires to stoneware temps too.

Here are three of them done. Not looking like much at the moment. But will post again once they are out of the glaze firing.

Thursday, 26 September 2013

Clutter City Autumnal Market


This is where I will be with my little table on Saturday.
Come in and say hello
x

Tuesday, 17 September 2013

Glass melt Sea forms school project Results

Last post was all about the sea-forms project I have been involved in at school. Here it is if you want to see the initial stages.
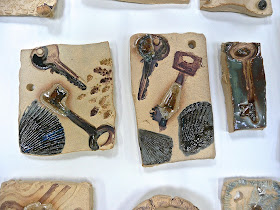
After the glaze and glass melting stage this is what the results looked like.


These two are the same piece except in the second photo I have added some Indian Ink to the glass crackles to define the lines


These pieces have also had Indian Ink rubbed onto the
 glass after firing.


I will post more photos of the next stage.
                            View more glass and ceramic melt              projects here.


Tuesday, 10 September 2013

School Art project Glass melting on claywork sea forms

Last term at school students were asked to look at the sea, from sea forms, creatures, sand to debris washed up on the beaches. 
It is part of a large project which encompasses nearly two terms so they really have the opportunity to explore their ideas and use different medium. So far they have used printing inks (mono printing) and collage and drawings to represent these ideas, but I am going to show you the clay work part as this is what I have been more involved in.
Firstly they made their forms from buff clay, mostly organic shapes with shells, stones, wood act.. impressed into the clay. Some students preferred to use relief shapes and made tiny sculptures others put holes in there work as later on they will be stitched onto hessian and canvas and used as part of a final piece of work. (more on that later when they are done.)
But for now here are the photos showing how the process has gone so far.
Here are some straight after they have been made.

and after a bisque firing


Oxides and glazes were applied after the bisque firing, just small quantities though, hence the small cups

Students then chose glass beads to place on their work to melt in the kiln.
We used beads as its safer to use, but you can melt broken glass shards if you are brave enough and have protective gloves.

Setting up the work in the school.

All set to fire this week!!!
Fingers crossed it will be ok and we get some good results. I worry far more with a glaze firing especially when its all students work.

Here is an example of my melted glass bowls I did earlier this year. I gave these as an example of how their work may appear after melting glass.